A complete guide on- How to create a flutter package and publish in flutter pub.dev?

Ever developed something cool in flutter and wanted to share with people around? Well, got you covered!
Before we start, let me brief a few terms in case they seem alien to you-
Package- A sharable flutter project containing modular dart code.
Pub.dev- The official package repository for Dart and Flutter apps.
Pub Points- Flutter team scans your package and award you with pub points on adhering to certain qualities and standards.
Pub Scores- The likes on your package, pub points and popularity of your package all together are known as pub scores.
One thing to note here is that a package is not same as a plugin. To put it simply- a package contains only dart code while a plugin contains both dart and native code (kotlin, java, swift etc). Check out for more details.
Publishing your package to flutter pub.dev is as easy as it gets and believe me there is no hard and fast rule or standard for your content. So, let’s get started and don’t shy away even if you got something sloppy because there’s always an option to update your package.
1. Create a framework for your package with Visual Studio Code
- Open your Visual Studio Code and press shift+command+p (if in mac) or ctrl+shift+p (if in windows/linux) to open the command palette. Alternatively, you can just go to view in the application menu at top and choose to open the command palette.

- Search for Flutter and click on Flutter: New Project as it appears. You will be asked to choose the type of the flutter project (flutter template) you want to create, go with Package. Choose a local folder where you want to save the package, give a name for your package and you’re all set.

- I’ll be creating a very basic package and name it as clock_widget, so that you guys can follow along. Well, it’s time to code now as we already have the framework ready for the package, thanks to flutter!
2. Code for your package
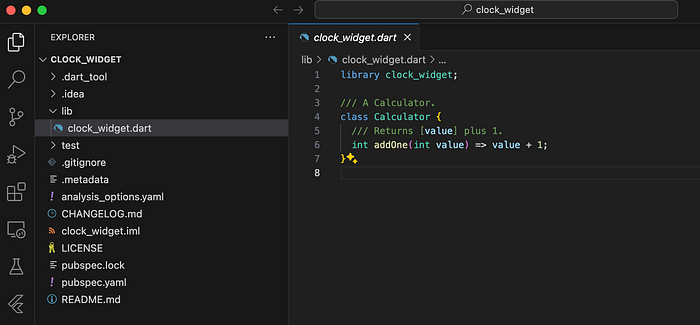
- Since you’re contributing a package to flutter pub.dev, I assume you’ve at least some experience with flutter. Hence, similar to how we code in flutter- We will directly jump to the lib folder/directory (which is our code-space as we know). You can see a file is already created with your given package name inside lib, in my case it’s clock_widget.dart

- Select to open the dart file and you will see a dummy calculator class created inside it, with your package name import at top as library package_name. It should look like the one below, note that this is your main file/class which will be catered to the users-
Now, all we need to do is change the class name as required and add our code. You can also create more files inside lib to use in your main class (basically as code splitting approach).
The test file in your test directory will throw error once you change the class name. To resolve that just clear the whole file and replace with this
// clock_widget_test.dart

import 'package:flutter_test/flutter_test.dart';
import 'package:clock_widget/clock_widget.dart'; // Import for your main file

void main() {
  testWidgets('Test', (WidgetTester tester) async {
    // Replace ClockWidget() with your own class from the main file
    await tester.pumpWidget(const ClockWidget());
  });
}
3. A sample code preview
I’ll create two files as follows for example-
i) clock_widget.dart- This is the main file as mentioned earlier
ii) digital_clock_widget.dart- It will display the current time in a stream
// clock_widget.dart

library clock_widget;
import 'package:clock_widget/digital_clock_widget.dart';
import 'package:flutter/material.dart';


class ClockWidget extends StatelessWidget {
  final Color bgColor;

  const ClockWidget({super.key, this.bgColor = Colors.white});

  @override
  Widget build(BuildContext context) {
    return Container(
      color: bgColor,
      child: const DigitalClock(),
    );
  }
}
Here I've given bgColor (background colour for the clock widget) as a prop, so that user can customise accordingly as per their need when required. It is a good idea to make your package highly customisable which in turn makes it more user-friendly.
// digital_clock_widget.dart

import 'package:flutter/material.dart';
import 'package:intl/intl.dart';

class DigitalClock extends StatelessWidget {
  const DigitalClock({super.key});

  @override
  Widget build(BuildContext context) {
    return Container(
      alignment: Alignment.center,
      child: StreamBuilder<DateTime>(
        stream: Stream.periodic(const Duration(seconds: 1), (_) => DateTime.now()),
        builder: (context, snapshot) {
          String timeString =
              DateFormat.Hms().format(snapshot.data ?? DateTime.now());
          return Text(
            timeString,
            style: const TextStyle(fontSize: 36),
          );
        },
      ),
    );
  }
}
We are done with our package now but that’s not it, we will have to adhere to dart conventions, add some neat documentations and modify some configurations. This will effectively increase our pub points, check here to know more about pub points. Let’s hop in quickly!
4. Add an example app to your package
Adding an example flutter app to your package not only increases your pub points but also makes your package easier to use. Here’s how you can do that-
i) Create a new VS Code window, open the Command Palette, Type Flutter and select Flutter: New Project as it appears and this time choose an Application.

ii) Choose your package’s directory/folder as the target folder for the new flutter app and then name it as example followed by Enter. Close this VS Code window and go back to your package’s VS Code window. This should create an example app inside your package.
iii) Now inside the lib directory/folder of the example app, there should be a main.dart file. Now replace its content as follows-
// example/lib/main.dart

import 'package:flutter/material.dart';
import 'package:clock_widget/clock_widget.dart';

void main() {
  runApp(const ExampleApp());
}

class ExampleApp extends StatelessWidget {
  const ExampleApp({super.key});

  @override
  Widget build(BuildContext context) {
    return MaterialApp(
      title: 'Custom Top Snackbar Demo',
      theme: ThemeData(
        primarySwatch: Colors.blue,
      ),
      home: const ExamplePage(),
    );
  }
}

class ExamplePage extends StatelessWidget {
  const ExamplePage({super.key});

  @override
  Widget build(BuildContext context) {
    return Scaffold(
      appBar: AppBar(
        title: const Text('Package Example'),
      ),
      body: const Center(
        child: Column(
          mainAxisAlignment: MainAxisAlignment.center,
          crossAxisAlignment: CrossAxisAlignment.start,
          children: <Widget>[
            // Replace ClockWidget() with the implementation of your own package.
            ClockWidget(),
          ],
        ),
      ),
    );
  }
}
iv) Getting errors right? It is because we need to add the package to the pubspec.yaml of the example app in order to use that, just like we add other packages from pub dev. To do it- Open the pubspec.yaml file of the example app, replace its content as provided below and run flutter pub get command -
# example/pubspec.yaml

name: example
description: "A new Flutter project."
publish_to: 'none'

version: 1.0.0+1

environment:
  sdk: '>=3.3.3 <4.0.0'

dependencies:
  flutter:
    sdk: flutter

  # Replace the clock_widget with your own package name and its path as ../
  clock_widget:
    path: ../

  # Add other packages as required for the example app

dev_dependencies:
  flutter_test:
    sdk: flutter
  flutter_lints: ^3.0.0

flutter:
  uses-material-design: true
You also might be getting an error in test directory, replace this code in your widget_test.dart file. Free feel to add test cases later as you go.
// example/lib/test/widget_test.dart

import 'package:example/main.dart';
import 'package:flutter_test/flutter_test.dart';

void main() {
  testWidgets('Example App Test', (WidgetTester tester) async {
    // ExampleApp() is the class we created in main.dart above
    await tester.pumpWidget(const ExampleApp());
  });
}
This is it for the example app setup. You can run your example app in an emulator or real device and test how your package works as well. Now, we are super close! Brace yourselves.
5. Updates, formatting and documentation
First, We will start with documentation. Go to your main file and in the line above the main class, start adding descriptive/documentation comments. Here I’m adding documentation comments only for the main file, you can add for other files as well. Read more on comments here. Syntax for documentation comment is ‘ /// ’.
class ClockWidget extends StatelessWidget {
/// The background color of the widget.
final Color bgColor;
/// A widget that displays a digital clock.
const ClockWidget({super.key, this.bgColor = Colors.white});
@override
Widget build(BuildContext context) {
return Container(
color: bgColor,
child: const DigitalClock(),
);
}
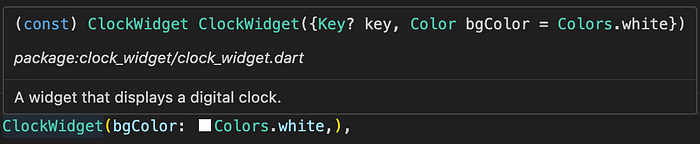
}The best thing about adding documentation comments to classes, functions and props is that when a user hovers over the implementation of these from your package, these comments show up like hints. Also, these documentation comments will get added up to the API reference of your package when your package gets published into pub dev. This is how it looks on hover-
Second, we will update these three files- README.md, pubspec.yaml and CHANGELOG.md.
README.md- This file is really important as it decides how your package’s front page will look and what will it hold. It will differ from package to package but I’ll provide one for the clock_widget here. Also, You can easily generate your readme file content by giving a prompt to AI tools like chat GPT.
## Features

- Display a digital clock in UI.
- Not affected by change in context, it's a stream service.


## Usage

### Installation

Add `clock_widget` to your `pubspec.yaml` file:

```yaml
dependencies:
  clock_widget: ^0.0.1 # Use the latest version
```

### Import

```dart
import 'package:flutter/material.dart';
import 'package:clock_widget/clock_widget.dart';
```

### Clockwidget implementation

To show the digital clock widget, use the `ClockWidget()` method:

```dart
ClockWidget(
  // Prop to customise the background color
  bgColor: Colors.white,
),
```
pubspec.yaml- I won’t waste my time explaining what is pubspec.yaml file, you already know it’s a configuration file used by dart for project’s dependencies and settings. Here, we need to change three fields-
- Modify description to something suitable as per your project.
- Keep the version as 0.0.1. Note that, every time you wish to update your package your version also has to be updated here. In short, change in version is considered as an update.
- In homepage you can add your GitHub repo link but leave it blank for now since we will be pushing our code to gitHub and will be creating a repo for our package just in a while.
name: clock_widget
description: A flutter package that provides a clock widget that can be used to display the current time.
version: 0.0.1
homepage: #Leave it blank for now

environment:
  sdk: '>=3.3.3 <4.0.0'
  flutter: ">=1.17.0"

dependencies:
  flutter:
    sdk: flutter
  intl: ^0.18.1 # For date formatting

dev_dependencies:
  flutter_test:
    sdk: flutter
  flutter_lints: ^3.0.0
CHANGELOG.md- This file adds up a Changelog tab to your package’s page where developers take a look of all the versions released along with their release notes. This adds value as user can always know what’s new in an update. Update this every time you push a new package update, here’s how you can maintain it-
## 0.0.2
* Dart formatted and added hints to methods for simplicity
* Modified README with instructions to use

## 0.0.1

* Publish on pub.dev
Note- I’ve added 0.0.2 for reference to show how you can keep on adding to changelog.md with every version update. Please don’t get confused and add 0.0.2 in your initial push. For our first push we will only include 0.0.1 as put in pubspec.yaml file as well.
Here’s how my current changelog.md file looks like-
## 0.0.1

* Publish on pub.dev
Second step, time to add a license now:
So, the flutter recommends BSD 3-Clause license but you’re free to choose otherwise. You can find all open-sources licenses here https://opensource.org/licenses.
To add license, we will use this extension in VS Code called Choose a License. Go to Extensions in the left menu panel in the VS Code or use this keyboard shortcut- shift+command+x (if in mac) or ctrl+shift+x (if in windows/linux) to open and type “Choose a License”. Then click to install the extension when it appears.
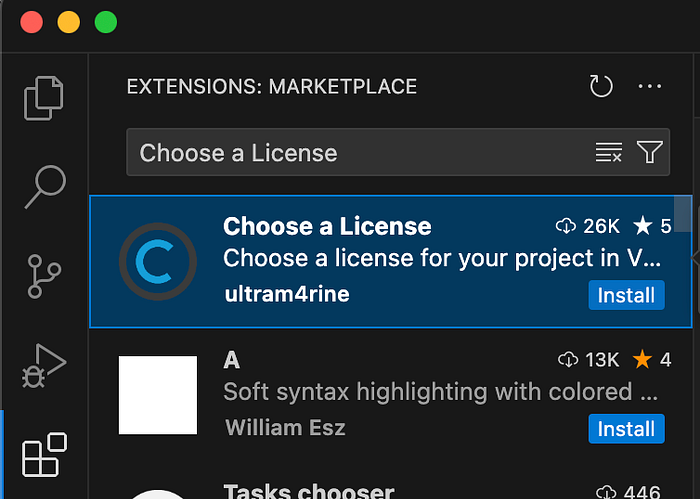
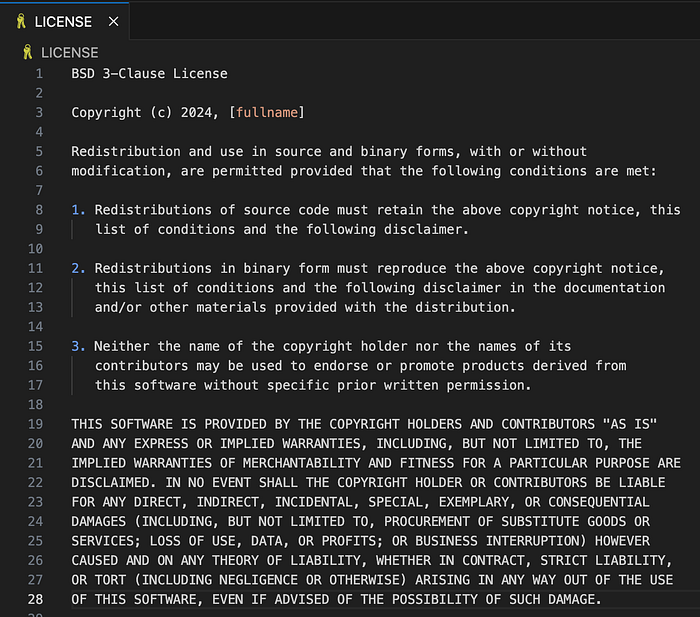
Once installed, just go the the command palette and type license. Select License: Choose license and then a list of license will come up. Choose your desired license from the list and click Yes when it asks to override your existing empty license file. Once the license is generated replace the [fullname] field with either your legal full name or GitHub username and this is done.
Third step, let’s format our code as per dart conventions. We will have to format the code we have added with dart convention in order to gain pub points. You can just open the file you want to format in code panel and go to command palette. Type and select Format Document and it’s done. Or you can use this command in your VS Code terminal instead-
dart format path1 path2 […]You can add one or multiple paths, also make sure you format the files in the example app we added. I would recommend to format using the dart format command in terminal. Read more about dart code formatting here- https://docs.flutter.dev/tools/formatting.
Let’s end this by finally pushing our code to a Github repo. Go to the source control in the left menu panel in VS Code or press ctrl+shift+g. Select Publish to GitHub and proceed by choosing Publish to GitHub public repository from command palette. This shall push your code to GitHub and now you’ve a repo for your package.
Remember we left the homepage field blank in our pubspec.yaml file? You can now add your GitHub repo link there. It should look like this-
name: clock_widget
description: A flutter package that provides a clock widget that can be used to display the current time.
version: 0.0.1
homepage: https://github.com/deb-sahu/clock_widget

environment:
  sdk: '>=3.3.3 <4.0.0'
  flutter: ">=1.17.0"

dependencies:
  flutter:
    sdk: flutter
  intl: ^0.18.1 # For date formatting

dev_dependencies:
  flutter_test:
    sdk: flutter
  flutter_lints: ^3.0.0
6. Publish the package
Ready to publish? Let’s get started by creating an account in pub.dev. You can use your google account to sign up.
Now, here’s a catch- you can now publish your package using your google account that got linked to pub.dev but sadly flutter will show it as unverified. Basically, to have a verified publisher badge ☑️ next to your package name, you need to create a verified publisher.

You can proceed with Create publisher from My pub.dev menu at top to create one, but note that to be a verified publisher it requires a domain/website of your own. If you have a domain go for it else you can always buy a cheap one from sites like GoDaddy, Namecheap etc. You can also choose not to be a verified publisher as it doesn’t block you from publishing your package anyways.
Next, let’s give a dry run to our package to check if everything is alright. You can do that by using either of the following commands in your VS Code terminal-
flutter pub publish --dry-run

OR

dart pub publish --dry-run
It will validate your package and ensure that all conventions and structure are being followed. If it gives 0 warnings, you’re good to publish!
In case you get any warnings, please try to resolve those before proceeding to publish.
Finally, to publish your package use either of the following commands in your VS Code terminal-
flutter pub publish

OR

dart pub publish
It will ask for a confirmation like this-
Do you want to publish clock_widget 0.0.1 to https://pub.dev (y/N)?
Press y and then enter to continue.
That will upload your package to pub.dev and will show a success message along with a link to your package’s page in terminal saying-
Successfully uploaded <your package link> version 0.0.1, it may take up-to 10 minutes before the new version is available.
Congrats your package is now published!! 🏅
To update your package, make your code or file changes as required and then update your version to 0.0.2 (and so on with every further update) in following three places-
i) Update the version field in pubspec.yaml file
ii) Add the new version to changelog.md file along with the release notes, same way we did above in step-5.
iii) Update to current version in readme.md file wherever necessary.
Do a dry run for publish to check for warnings and then publish your package again using the same commands above to update your package.
Here’s the GitHub repo for the package which I created above to give a walkthrough. https://github.com/deb-sahu/clock_widget
Thank you for reading this article. I hope you find it useful. Feel free to connect on LinkedIn for any questions or queries!